
この記事は Android スマホ用のアプリ開発の中で、
今後の開発で再使用性が高いと思われるコーディングをまとめたものです。
Javaでの開発経験、XML 構文規則、Androidのアプリ開発経験がある方を対象としています。
Androidのアプリ開発でお役にたててれば、嬉しいです。
(これからAndroidのアプリ開発やJavaでの開発を始めたい方への案内は、記事の最後で紹介します)
画像データのぼかし処理を実装する
本格的に画像や写真を編集するならコレです♪
ポイント
画像編集ソフトのぼかし機能(Blur)はライブラリ(blurry)を使用すれば、簡単なコードで実装できます。
今回は、blurryを使用した画像のぼかし機能の実装を紹介します。
blurry
blurryを使用するための準備
blurryを使用するには、モジュールのbuild.gradleファイルに定義の追加が必要です。
◎build.gradle(モジュール)
2025年7月現在の最新バージョンは 3.8.0 です。
dependencies {
    :
    implementation 'jp.wasabeef:blurry:4.0.1'
}
◎ライセンス表記
blurryは、Apatche License 2.0です。
アプリで使用する場合、ライセンス表記が必要です。

画像データのぼかし処理
ImageViewを継承したクラスに画像データのぼかし処理メソッドとして実装します。
画像データの一部にぼかし処理を行う場合はrFrame(RectF)に範囲を指定します。
public class BlurImageView extends AppCompatImageView {
    :
    private Context context;
    private RectF rFrame; // ぼかし処理する範囲
    public BlurImageView(Context context) {
        this(context, null);
    }
    public BlurImageView(Context context, AttributeSet attrs) {
        this(context, attrs, 0);
    }
    public BlurImageView(Context context, AttributeSet attrs, int defStyle) {
        super(context, attrs, defStyle);
        this.context = context;
        float imgW = getDrawable().getIntrinsicWidth();
        float imgH = getDrawable().getIntrinsicHeight();
        RectF rImage = new RectF();
        matrix.mapRect(rImage, new RectF(0f, 0f, imgW, imgH));
        rFrame = rectF(rImage);
        :
        // ぼかし処理する範囲(rFrame)を指定する処理を記述
    }

    private Bitmap getBitmap() {
        Bitmap bitmap = null;
        Drawable drawable = getDrawable();
        if (drawable instanceof BitmapDrawable) {
            bitmap = ((BitmapDrawable) drawable).getBitmap();
        }
        return bitmap;
    }

    public Bitmap blurryBitmap(int radius, int sampling) {
        Bitmap bitmap = getBitmap();
        Bitmap mutableBitmap = bitmap.copy(Bitmap.Config.ARGB_8888, true);
        bitmap.recycle();
        Canvas canvas = new Canvas(mutableBitmap);
        ImageView imageView = new ImageView(context);
        Paint paint = new Paint();
        paint.setFilterBitmap(true);
        int x = Math.round(rFrame.left - rImage.left);
        int y = Math.round(rFrame.top - rImage.top);
        int width = Math.round(rFrame.right - rImage.left) - x;
        int height = Math.round(rFrame.bottom - rImage.to) - y;
        Blurry.with(context).radius(radius).sampling(sampling).from(Bitmap.createBitmap(mutableBitmap, x, y, width, height)).into(imageView);
        canvas.drawBitmap(((BitmapDrawable)imageView.getDrawable()).getBitmap(), x, y, paint);
        return mutableBitmap;
    }
}画像データのぼかし処理をBitmapで行うため、mutableに変更します。
画像データをぼかし処理するためにBlurry.with.from(ぼかし処理する範囲).into(画像データ)を使用します。
radiusとsamplingでぼかし具合を調整します。
処理後の画像データ(Bitmap)を取得するためにCanvasを使用します。
画像データをぼかし処理してファイル出力
ImageViewを継承したクラスで画像ファイルの読み込み、画像データのぼかし処理、処理した画像データをファイル出力します。
:
// 画像データの読み込み
BlurImageView blur= findViewById(R.id.blur);
try (FileInputStream fileinputStream= new FileInputStream(new File(context.getFilesDir(), "input.png"))) {
Bitmap bitmap = BitmapFactory.decodeStream(fileinputStream);
blur.setImageBitmap(bitmap);
} catch (Exception e) {
// エラー処理
:
}
:
// 画像データをぼかし処理
Bitmap bitmap = blur.blurryBitmap(4, 4);
:
// 画像データの出力
try (FileOutputStream fileOutputStream = new FileOutputStream(new File(context.getFilesDir(), "output.png"))) {
bitmap.compress(Bitmap.CompressFormat.PNG, 100, fileOutputStream);
} catch (Exception e) {
// エラー処理
:
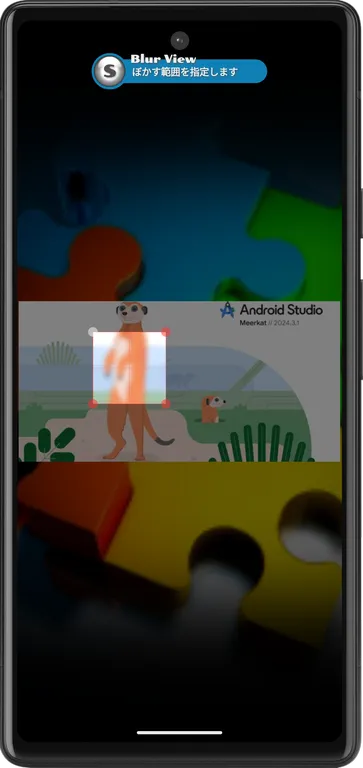
}ぼかし具合をradius(4)とsampling(4)で指定します。
画像データをぼかし加工しているAndroidアプリです。
今回は、ここまでです。
誤字脱字、意味不明でわかりづらい、
もっと詳しく知りたいなどのご意見は、
このページの最後にあるコメントか、
こちらから、お願いいたします♪
ポチッとして頂けると、
次のコンテンツを作成する励みになります♪
これからAndroidのアプリ開発やJavaでの開発を始めたい方へ
アプリケーション開発経験がない方や、アプリケーション開発経験がある方でも、JavaやC#などのオブジェクト指向言語が初めての方は、Androidのアプリ開発ができるようになるには、かなりの時間がかかります。
オンラインスクールでの習得を、強くおススメします。
未経験者からプログラマーを目指すのに最適です。まずは無料カウンセリングから♪

ゲーム系に強いスクール、UnityやUnrealEngineを習得するのに最適です。まずは無料オンライン相談から♪
参考になったら、💛をポッチとしてね♪
コメント欄