
この記事はAndroidスマホ用のアプリ開発の中で、
今後の開発で再使用性が高いと思われるコーディングをまとめたものです。
Javaでの開発経験、XML構文規則、Androidのアプリ開発経験がある方を対象としています。
Androidのアプリ開発でお役にたててれば、嬉しいです。
(これからAndroidのアプリ開発やJavaでの開発を始めたい方への案内は、記事の最後で紹介します)
◎テーマ
画面の縦横を検出して、動的にXMLで定義した画面レイアウト(ConstraintLayout)の属性値を変更したい
◎ポイント
レイアウト(ConstraintLayout)を使用して、オブジェクト(画面要素)の高さを属性(layout_constraintHeight_percent)で制御しています。
表示する画面を縦と横の両方で画面内にオブジェクトを収めようとした場合、縦の画面では余白が大きくなるため、属性値を縦と横で変更する必要があります。
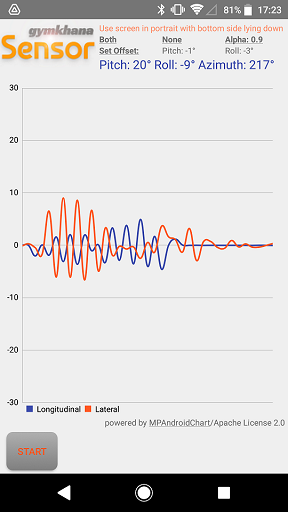
◎対応前
layout_constraintHeight_percentを横に合わせて、0.6で固定。
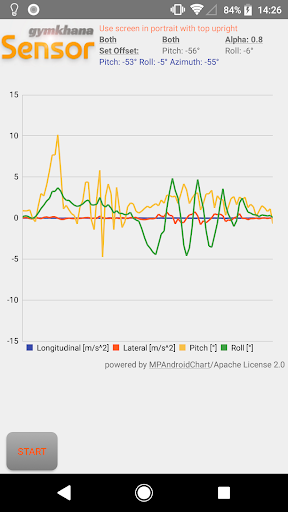
◎対応後
layout_constraintHeight_percentを縦の場合は0.75、横の場合は0.6で可変。
◎レイアウトXML(activity_main.xml)
<?xml version="1.0" encoding="utf-8"?>
<androidx.constraintlayout.widget.ConstraintLayout
    xmlns:android="http://schemas.android.com/apk/res/android"
    xmlns:tools="http://schemas.android.com/tools"
    xmlns:ads="http://schemas.android.com/apk/res-auto"
    xmlns:app="http://schemas.android.com/apk/res-auto"
    android:id="@+id/constraint_layout"
    android:layout_width="match_parent"
    android:layout_height="match_parent"
    android:background="@color/grey200"
    tools:context=".view.MainActivity">
    <Image Button
        android:id="@+id/title"
        android:layout_width="wrap_content"
        android:layout_height="wrap_content"
        android:background="@color/white"
        app:layout_constraintEnd_toStartOf="@id/screen"
        app:layout_constraintHeight_percent="0.15"
        app:layout_constraintStart_toStartOf="parent"
        app:layout_constraintTop_toTopOf="parent"
        app:srcCompat="@drawable/title_sensor"
        android:contentDescription="@string/description1" />
	:
    <com.github.mikephil.charting.charts.LineChart
        android:id="@+id/lineChart"
        android:layout_width="match_parent"
        android:layout_height="0dp"
        android:layout_margin="4dp"
        android:background="@android:color/transparent"
        ads:layout_constraintBottom_toTopOf="@+id/adView"
        ads:layout_constraintTop_toBottomOf="@+id/title"
        ads:layout_constraintVertical_bias="0.1"
        app:layout_constraintEnd_toEndOf="parent"
        app:layout_constraintHeight_percent="0.75"
        app:layout_constraintStart_toStartOf="parent" />
	:
</androidx.constraintlayout.widget.ConstraintLayout>
◎Java 制御部分のコーディング(MainActivity.java)
package com.gymtec.sensor.view;
import androidx.appcompat.app.AppCompatActivity;
import androidx.constraintlayout.widget.ConstraintLayout;
import androidx.constraintlayout.widget.ConstraintSet;
	:
public class MainActivity extends AppCompatActivity {
	:
    @Override
    protected void onResume() {
        super.onResume();
	      :
        //レイアウト調整
        ConstraintLayout constraintLayout = findViewById(R.id.constraint_layout);
        ConstraintSet constraintSet = new ConstraintSet();
        constraintSet.clone(constraintLayout);
        if (getResources().getConfiguration().orientation == Configuration.ORIENTATION_LANDSCAPE) {
            //横画面ではグラフの表示比率は0.6
            constraintSet.constrainPercentHeight(R.id.lineChart, 0.6f);
        } else {
            //横画面ではグラフの表示比率は0.75
            constraintSet.constrainPercentHeight(R.id.lineChart, 0.75f);
        }
        constraintSet.applyTo(constraintLayout);
画面の縦横は、getResources().getConfiguration().orientationを使用して判定しています。
横(Configuration.ORIENTATION_LANDSCAPE)の場合と、それ以外(縦)として属性値を設定しています。
ポイントとしては、レイアウト(ConstraintLayout)にID(android:id=”@+id/constraint_layout”)を指定して、
Javaでレイアウトのオブジェクトを取得して、属性値を変更するための制約(ConstraintSet)をコピー(clone)します。
コピーした制約で属性値を変更し、レイアウトに反映(applyTo)します。
これからAndroidのアプリ開発やJavaでの開発を始めたい方へ
アプリケーション開発経験がない方や、アプリケーション開発経験がある方でも、JavaやC#などのオブジェクト指向言語が初めての方は、Androidのアプリ開発ができるようになるには、かなりの時間がかかります。
オンラインスクールでの習得を、強くおススメします。
未経験者からプログラマーを目指すのに最適です。まずは無料カウンセリングから♪

ゲーム系に強いスクール、UnityやUnrealEngineを習得するのに最適です。まずは無料オンライン相談から♪

参考になったら、💛をポッチとしてね♪

コメント欄