
この記事は Androidスマホ用のアプリ開発の中で、
今後の開発で再使用性が高いと思われるコーディングをまとめたものです。
Java での開発経験、XML構文規則、Android のアプリ開発経験がある方を対象としています。
Android のアプリ開発でお役にたててれば、嬉しいです。
(これから Android のアプリ開発や Java での開発を始めたい方への案内は、記事の最後で紹介します)
Android13で通知のアクションを使用してアプリを操作する
Android 12(API レベル 32)以前で開発したアプリは、
SdkVersion を Android 13(API レベル 33)にするだけでは、
フォアグラウンド サービス開始の通知が表示されません。
その理由は、Android 13 から実行時の通知権限が導入されているからです。

Android 13 の機能と変更点はこちらです↓↓↓
Android 13 対応( 画像・動画・音声ファイルのメディア権限 )はこちらです↓↓↓
通知のアクションを使用するアプリのAndroid13対応
◎ポイント
フォアグラウンド サービスは通知を表示し、バックグラウンドで実行している事をユーザに認識させた状態で、実行するサービスプログラムです。
通知にアクションを設定することで、UIを持たないサービスでも操作ができるようなります。
Android 13 では、実行時の通知権限がないと、通知が表示されず、通知からの操作ができなくなります。
通知の表示、通知からサービスを操作するには、通知の権限(POST_NOTIFICATIONS)の権限指定と、ユーザー承認をリクエストする必要があります。
マニフェストファイルに権限を指定する
マニフェストファイル(AndroidManifest.xml)に権限を指定します。
通知の権限(uses-permission)を追加します。
<?xml version="1.0" encoding="utf-8"?>
<manifest
    xmlns:android="http://schemas.android.com/apk/res/android"
    xmlns:tools="http://schemas.android.com/tools"
    :
    <uses-permission android:name="android.permission.FOREGROUND_SERVICE"/>
    <uses-permission android:name="android.permission.POST_NOTIFICATIONS"/>
    :
フォアグラウンド サービスを実行するため、実行権限(FOREGROUND_SERVICE)を指定しています。
権限チェックとユーザ承認リクエスト
Android 12 (API レベル 32)より新しいバージョンの場合、実行時の通知権限が許可(PERMISSION_GRANTED)でない場合に、ユーザー承認をリクエストします。
    private static final int REQUEST_MULTI_PERMISSIONS = 101;
    :
    private void checkPermissions() {
        ArrayList<String> requestPermissions = new ArrayList<>();
        :
        // 通知
        if (Build.VERSION.SDK_INT > 32) {
            if (ContextCompat.checkSelfPermission(this, Manifest.permission.POST_NOTIFICATIONS) != PackageManager.PERMISSION_GRANTED) {
                requestPermissions.add(Manifest.permission.POST_NOTIFICATIONS);
            }
        }
        if (!requestPermissions.isEmpty()) {
            ActivityCompat.requestPermissions(this, requestPermissions.toArray(new String[0]), REQUEST_MULTI_PERMISSIONS);
        }
        :
    }
◎ユーザ承認のリクエスト画面
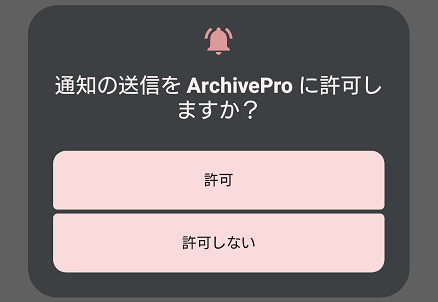
ユーザー承認結果を確認する
ユーザー承認の結果を確認し、許可(PERMISSION_GRANTED)でない場合は、処理を継続できないよう制御します。
   private boolean start = true;
   :
   @Override
    public void onRequestPermissionsResult(int requestCode, @NonNull String[] permissions, @NonNull int[] grantResults) {
        super.onRequestPermissionsResult(requestCode, permissions, grantResults);
        if (requestCode == REQUEST_MULTI_PERMISSIONS) {
            if (grantResults.length > 0) {
                for (int i = 0; i < permissions.length; i++) {
                    switch (permissions[i]) {
                        case Manifest.permission.POST_NOTIFICATIONS:
                            if (grantResults[i] != PackageManager.PERMISSION_GRANTED) {
                                start = false;
                                :
                            }
                            break;
                        :

                        default:
                    }
                }
            }
        }
        if (start) {
            :

        } else {
            button.setVisibility(View.VISIBLE);
        }
    }
ボタンを非表示にすることで、処理を継続できないようにしています。
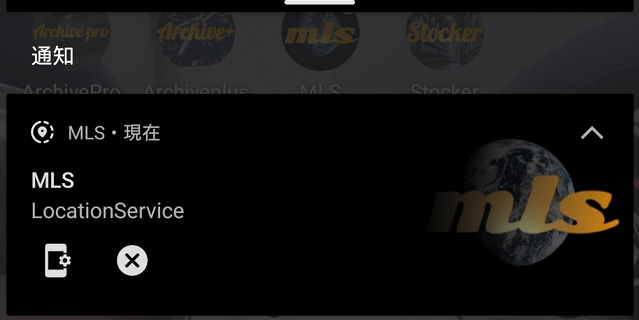
通知のアクションを設定してアプリを操作する
通知にアクションを設定することで、通知からアプリを操作できるようになります。
指定できる主なアクションは、アクティビティの起動や操作のブロードキャストです。
通知にアクションを指定する
通知には、テキストのメッセージを表示するほか、画像を表示したり、アクションを定義したアイコンを配置することができます。
アクションの指定は PendingIntent を使用します。
アクティビティの起動は getActivity、getBroadcast で操作をブロードキャストします。
操作をブロードキャストする場合、操作を受信して、処理するレシーバを実装する必要があります。
    private static final int[]              REQUEST_CODE = { 0, 1, 2 };
    :
    @Override
    public int onStartCommand(Intent intent, int flags, int startId) {
        PendingIntent pendingIntent1 = PendingIntent.getActivity(context,
                REQUEST_CODE[0],
                intent,
                PendingIntent.FLAG_IMMUTABLE);
        Intent intent2 = new Intent(this, LocationBroadcastReceiver.class);
        intent2.putExtra("COMMAND", "STOP");
        PendingIntent pendingIntent2 = PendingIntent.getBroadcast(context, REQUEST_CODE[1], intent2, PendingIntent.FLAG_IMMUTABLE);
        Intent intent3 = new Intent(this, MainActivity.class);
        PendingIntent pendingIntent3 = PendingIntent.getActivity(context, REQUEST_CODE[2], intent3, PendingIntent.FLAG_IMMUTABLE);
        // Foreground設定
        NotificationManager notificationManager = (NotificationManager) context.getSystemService(Context.NOTIFICATION_SERVICE);
        NotificationChannel channel = new NotificationChannel(TAG, TAG, NotificationManager.IMPORTANCE_DEFAULT);
        channel.setDescription("Silent Notification");
        channel.setSound(null, null);
        channel.enableLights(false);
        channel.enableVibration(false);
        channel.setLightColor(R.color.blue);
        if (notificationManager != null) {
            notificationManager.createNotificationChannel(channel);
            Notification notification = new NotificationCompat.Builder(context, TAG)
                    .setContentTitle(context.getString(R.string.app_name))
                    .setContentText(TAG)
                    .setSmallIcon(R.drawable.ic_round_share_location)
                    .setLargeIcon(BitmapFactory.decodeResource(getResources(), R.drawable.mls))
                    .setStyle(new androidx.media.app.NotificationCompat.MediaStyle().setShowActionsInCompactView(0))
                    .setWhen(System.currentTimeMillis())
                    .setContentIntent(pendingIntent1)
                    .addAction(new NotificationCompat.Action.Builder(R.drawable.ic_round_app_settings, context.getString(R.string.menu6), pendingIntent3).build())
                    .addAction(new NotificationCompat.Action.Builder(R.drawable.ic_round_cancel, context.getString(R.string.menu3), pendingIntent2).build())
                    .build();
            startForeground(1, notification);
        }
:アクションを指定(addAction)する場合は、NotificationCompat を使用します。
通知のスタイルの指定は、setStyle で行います。
MediaStyle のスタイルは、メディア再生コントロールですが、それ以外の用途でも使用できます。
アクションを定義したアイコンや背景に画像を表示させたい場合に、このスタイルを使用します。
アイコンの指定は addAction、画像の指定は setLargeIcon を使用します。
MediaStyle を使用する
MediaStyle を使用するには、モジュールの build.gradle ファイルに定義の追加が必要です。
dependencies {
    :
    implementation "androidx.media:media:1.6.0"
    :
}
クラス名の NotificationCompat が重複しているため、パッケージ名をフルで記述する必要があります。
import androidx.core.app.NotificationCompat;
            :
            Notification notification = new NotificationCompat.Builder(context, TAG)
           :
                    .setStyle(new androidx.media.app.NotificationCompat.MediaStyle().setShowActionsInCompactView(0))
                    :
通知の作成方法はこちらです↓↓↓
ブロードキャストした操作を受信するレシーバ
通知からブロードキャストした操作を受信するレシーバでは、操作がひとつであれば、onReceive に直接処理を記述します。
操作がひとつでない場合は、操作毎にレシーバをわけるか、intent で引き渡された値を使用して、操作に応じた処理を記述します。
public class LocationBroadcastReceiver extends BroadcastReceiver {
    @Override
    public void onReceive(Context context, Intent intent) {
        if (intent.getStringExtra("COMMAND") != null && intent.getStringExtra("COMMAND").equals("STOP")) {
            // サービス停止
            intent = new Intent(context, LocationService.class);
            context.stopService(intent);
        }
    }
}
今回は、ここまでです。
参考 : 通知に関する実行時の権限
Android 13 の実行時の通知権限に対応している Androidアプリです。

GPS位置情報中継アプリで動作確認済みのGPSロガーはこちらです↓↓↓
誤字脱字、意味不明でわかりづらい、
もっと詳しく知りたいなどのご意見は、
このページの最後にあるコメントか、
こちらから、お願いいたします♪
ポチッとして頂けると、
次のコンテンツを作成する励みになります♪
これからAndroidのアプリ開発やJavaでの開発を始めたい方へ
アプリケーション開発経験がない方や、アプリケーション開発経験がある方でも、JavaやC#などのオブジェクト指向言語が初めての方は、Androidのアプリ開発ができるようになるには、かなりの時間がかかります。
オンラインスクールでの習得を、強くおススメします。
未経験者からプログラマーを目指すのに最適です。まずは無料カウンセリングから♪

ゲーム系に強いスクール、UnityやUnrealEngineを習得するのに最適です。まずは無料オンライン相談から♪

参考になったら、💛をポッチとしてね♪
コメント欄