
この記事は Androidスマホ用のアプリ開発の中で、
今後の開発で再使用性が高いと思われるコーディングをまとめたものです。
Java での開発経験、XML構文規則、Android のアプリ開発経験がある方を対象としています。
Android のアプリ開発でお役にたててれば、嬉しいです。
(これから Android のアプリ開発や Java での開発を始めたい方への案内は、記事の最後で紹介します)
リスト要素の TextView を修飾できるシンプルなカスタム ListView を実装する
ポイント
Android標準のListViewは、リスト要素のTextViewの属性は、レイアウト上でひとつしか定義できないため、リストのアイテム毎にTextViewの色や文字サイズの変更など修飾することができません。
ListViewにセットするAdapterをカスタムすることで、リストのアイテム毎にTextViewの文字サイズや色の変更など修飾することが可能になります。
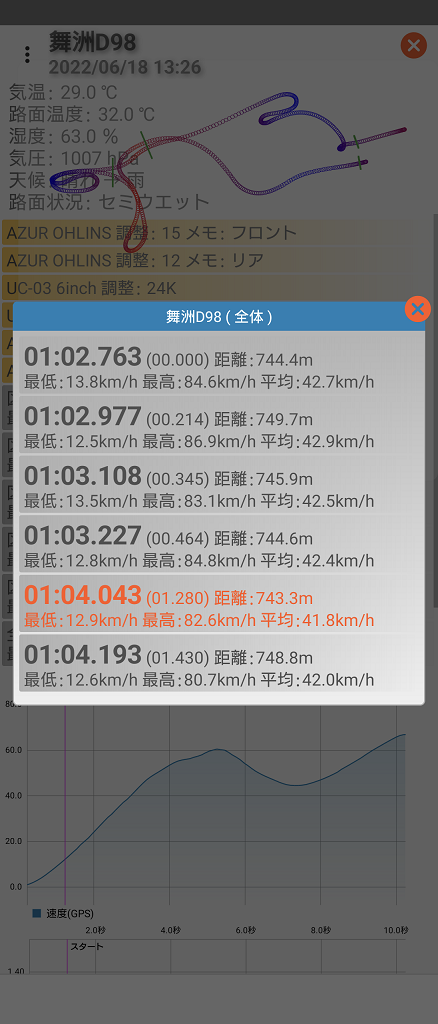
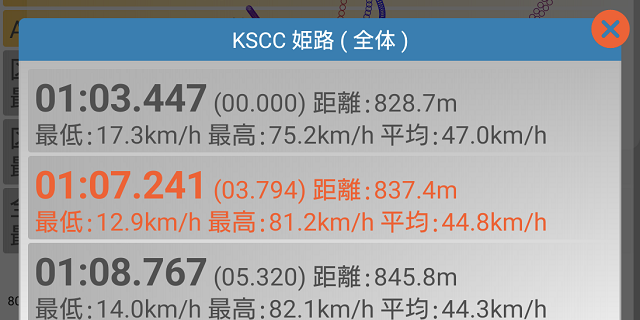
リスト要素のTextViewの文字サイズの変更、色を修飾できるシンプルなカスタムListViewを実装したダイアログ画面です。
計測タイムの文字だけ、目立つように大きく表示して、現在選択しているデータを識別できるように文字を橙色で表示します。
ListView を使用したダイアログ画面
タイトルのTextView 、リスト選択のListView 、画面を閉じるImageViewで構成するダイアログ画面です。
リスト選択と閉じる操作の処理は、インタフェースを使用します。
    :
public class CustomDialogCustomList extends DialogFragment {
    private CustomDialogItemListener    customDialogItemListener = null;
    private CustomAdapter               customAdapter;
    // カスタムアダプタ //
    public abstract static class CustomAdapter extends ArrayAdapter<String> {
        LayoutInflater layoutInflater;
        public CustomAdapter(Context context) {
            super(context, 0);
            layoutInflater = LayoutInflater.from(context);
        }
        public abstract View getView(int position, View view, ViewGroup parent);
    }
    @NonNull
    @Override
    public Dialog onCreateDialog(Bundle savedInstanceState) {
        String title = requireArguments().getString("TITLE");
        Dialog dialog = new Dialog(getActivity());
        dialog.getWindow().requestFeature(Window.FEATURE_NO_TITLE);
        dialog.getWindow().setFlags(WindowManager.LayoutParams.FLAG_FULLSCREEN,
                WindowManager.LayoutParams.FLAG_LAYOUT_IN_SCREEN);
        dialog.setContentView(R.layout.dialog_customlist);
        DisplayMetrics displayMetrics = getResources().getDisplayMetrics();
        int dialogWidth = (int) (displayMetrics.widthPixels * 0.98f);
        int dialogHeight = (int) (displayMetrics.heightPixels * 0.98f);
        WindowManager.LayoutParams layoutParams = dialog.getWindow().getAttributes();
        layoutParams.width = (Math.min(dialogWidth, dialogHeight));
        dialog.getWindow().setAttributes(layoutParams);
        dialog.getWindow().setBackgroundDrawable(new ColorDrawable(Color.TRANSPARENT));
        dialog.setCanceledOnTouchOutside(false);
        // タイトル
        TextView textView = dialog.findViewById(R.id.dialog_title);
        textView.setText(title);
        // リスト
        ListView listView = dialog.findViewById(R.id.dialog_item);
        listView.setAdapter(customAdapter);
        listView.setOnItemClickListener((parent, view, position, id) -> {
            if (customDialogItemListener != null)
                customDialogItemListener.doItemClick(parent, view, position, id);
            dismiss();
        });
        dialog.findViewById(R.id.dialog_close).setOnClickListener(view -> {
            if (customDialogItemListener != null)
                customDialogItemListener.doCloseClick(view);
            dismiss();
        });
        return dialog;
    }
    public void setCustomDialogItemListener(CustomDialogItemListener customDialogItemListener) {
        this.customDialogItemListener = customDialogItemListener;
    }
    public void setCustomAdapter(CustomAdapter customAdapter) {
        this.customAdapter = customAdapter;
    }
    @Override
    public void onDetach() {
        super.onDetach();
        if (customDialogItemListener != null)
            customDialogItemListener = null;
        if (customAdapter != null)
            customAdapter = null;
    }
}
リスト要素の TextView の文字サイズの変更、色を修飾
ダイアログ画面のタイトルをBundleにセットし、ダイアログ画面クラスをインスタンス化します。
CustomAdapterのgetViewメソッドでリスト要素のTextViewの文字サイズと色を変更します。
文字サイズの変更は、HtmlCompatを使用して、Htmlタグで指定します。
        :
import static androidx.core.text.HtmlCompat.FROM_HTML_MODE_COMPACT;
        :
        // リスト要素のTextViewに表示する文字列リスト
        ArrayList<String> list = new ArrayList<>();
        :
        Bundle bundle = new Bundle();
        bundle.putString("TITLE", title);
        CustomDialogCustomList customDialogCustomList = new CustomDialogCustomList();
        CustomDialogCustomList.CustomAdapter arrayAdapter = new CustomDialogCustomList.CustomAdapter(context) {
            @Override
            public View getView(int position, View view, ViewGroup parent) {
                if (view == null)
                    view = layoutInflater.inflate(R.layout.item_vertical1, parent,false);
                TextView textView = view.findViewById(R.id.text_item);
         :
                textView.setTextColor( // 色を変更する条件 ? context.getColor(R.color.theme500) : context.getColor(R.color.grey700));
                textView.setText(HtmlCompat.fromHtml(String.format("<big><big>%s</big></big> %s", // 大きいサイズの文字列 , // 普通サイズの文字列 ),FROM_HTML_MODE_COMPACT));
                return view;
            }
        };
        for (String string : list)
            arrayAdapter.add(string);
        customDialogCustomList.setCustomAdapter(arrayAdapter);
        customDialogCustomList.setCustomDialogItemListener(new CustomDialogItemListener() {
            @Override
            public void doItemClick(AdapterView<?> parent, View view, int position, long id) {
                // リストを選択した場合の処理
                :
            }
            @Override
            public void doCloseClick(View view) {
                // 画面を閉じる場合の処理
                :
            }
        });
        FragmentManager fragmentManager = getSupportFragmentManager();
        customDialogCustomList.setArguments(bundle);
        customDialogCustomList.show(fragmentManager, title);
        :
インタフェース
「リスト選択」と「画面を閉じる」のアイテムクリックイベントリスナー
    :
public interface CustomDialogItemListener extends EventListener {
    void doItemClick(AdapterView<?> parent, View view, int position, long id);
    void doCloseClick(View view);
}
レイアウト定義XML(dialog_customlist.xml)
ダイアログ画面のレイアウト
<RelativeLayout
    xmlns:android="http://schemas.android.com/apk/res/android"
    xmlns:tools="http://schemas.android.com/tools"
    android:layout_width="match_parent"
    android:layout_height="match_parent" >
    <LinearLayout
        android:layout_width="match_parent"
        android:layout_height="wrap_content"
        android:layout_alignParentTop="true"
        android:layout_marginTop="8dp"
        android:layout_marginLeft="8dp"
        android:layout_marginRight="8dp"
        android:paddingBottom="8dp"
        android:background="@drawable/bg_dialog1"
        android:gravity="center_horizontal"
        android:orientation="vertical">
        <TextView
            android:id="@+id/dialog_title"
            android:layout_width="match_parent"
            android:layout_height="wrap_content"
            android:background="@drawable/bg_dialog_title"
            android:gravity="center"
            android:padding="4dp"
            android:textSize="14sp"
            android:textColor="@android:color/white"/>
        <ListView
            android:id="@+id/dialog_item"
            android:layout_width="match_parent"
            android:layout_height="wrap_content"
            android:layout_gravity="center_horizontal"
            android:layout_marginLeft="4dp"
            android:layout_marginTop="4dp"
            android:layout_marginRight="4dp"
            android:paddingBottom="4dp" />
    </LinearLayout>
    <ImageView
        android:id="@+id/dialog_close"
        android:layout_width="30dp"
        android:layout_height="30dp"
        android:layout_alignParentEnd="true"
        android:layout_alignParentTop="true"
        android:background="@drawable/ic_round_cancel"
        tools:ignore="ContentDescription" />
</RelativeLayout>
レイアウト定義XML(item_vertical1.xml)
リストアイテムのレイアウト
<LinearLayout
    xmlns:android="http://schemas.android.com/apk/res/android"
    android:layout_width="match_parent"
    android:layout_height="wrap_content"
    android:orientation="vertical"
    android:background="@android:color/transparent">
    <FrameLayout
        android:layout_width="match_parent"
        android:layout_height="wrap_content"
        android:orientation="vertical"
        android:layout_marginStart="2dp"
        android:layout_marginEnd="2dp"
        android:layout_marginTop="1dp"
        android:layout_marginBottom="1dp"
        android:background="@drawable/bg_grad_grey2">
        <TextView
            android:id="@+id/text_item"
            android:textSize="16sp"
            android:textColor="@color/grey700"
            android:layout_width="match_parent"
            android:layout_height="wrap_content"
            android:layout_marginTop="1dp"
            android:layout_marginBottom="1dp"
            android:layout_marginStart="4dp"
            android:layout_marginEnd="4dp"
            android:background="@android:color/transparent"/>
    </FrameLayout>
</LinearLayout>
今回は、ここまでです。
シンプルなカスタムListViewを使用している Androidアプリです。

防水なので、お風呂で音楽を聴きながら、疲れを癒しています♪
誤字脱字、意味不明でわかりづらい、
もっと詳しく知りたいなどのご意見は、
このページの最後にあるコメントか、
こちらから、お願いいたします♪
ポチッとして頂けると、
次のコンテンツを作成する励みになります♪
これからAndroidのアプリ開発やJavaでの開発を始めたい方へ
アプリケーション開発経験がない方や、アプリケーション開発経験がある方でも、JavaやC#などのオブジェクト指向言語が初めての方は、Androidのアプリ開発ができるようになるには、かなりの時間がかかります。
オンラインスクールでの習得を、強くおススメします。
未経験者からプログラマーを目指すのに最適です。まずは無料カウンセリングから♪

ゲーム系に強いスクール、UnityやUnrealEngineを習得するのに最適です。まずは無料オンライン相談から♪

参考になったら、💛をポッチとしてね♪
コメント欄