
この記事は Android スマホ用のアプリ開発の中で、
今後の開発で再使用性が高いと思われるコーディングをまとめたものです。
Java での開発経験、XML 構文規則、Android のアプリ開発経験がある方を対象としています。
Android のアプリ開発でお役にたててれば、嬉しいです。
(これから Android のアプリ開発や Java での開発を始めたい方への案内は、記事の最後で紹介します)
Jetpack Media3のExoPlayerで動画や音楽を再生する
ExoPlayerは、Github でホストされるオープンソースプロジェクトでしたが、Jetpack Media3ライブラリとして統合され、今後はMedia3版が主流となる予定です。
基本的な使い方は同じですので、Media3版を使用することをおすすめします。
◎オープンソース版
ExoPlayerは動画・音楽ファイルのローカル再生のほか、動的適応型 HTTP ストリーミング(DASH)、SmoothStreaming、共通暗号化など、MediaPlayerではサポートされていない機能をサポートしています。
動画を再生表示するビュー画面、動画や音楽の再生や一時停止などを操作するためのコントローラなどカスタマイズ可能なコンポーネントをもつライブラリです。
今回はMedia3版のExoPlayerを使用して、動画や音楽をローカル再生する方法を紹介いたします。
ExoPlayerを使用するための準備
ExoPlayerを使用するには、モジュールのbuild.gradleファイルに定義の追加が必要です。
◎build.gradle(モジュール)
2024年11月現在の最新バージョンは1.5.0です。
dependencies {
    …
    implementation 'androidx.media3:media3-exoplayer:1.5.0'
    implementation 'androidx.media3:media3-ui:1.5.0'
    implementation 'androidx.media3:media3-session:1.5.0'
    …
}メディアストアの音楽や動画にアクセスする
アプリで使用する動画や音楽ですが、メディアストアでハンドリングする方法が一般的です。
メディアストアの動画や音楽ファイルにアクセスする場合、きめ細かいメディア権限を設定する必要があります。
詳細は、Android13対応(ファイルのメディア権限)で紹介しています。
ExoPlayerで動画を再生する
ExoPlayerで動画を再生するには、動画ファイルのアクセスに必要なUriが必要です。
MP4形式以外の動画ファイルをMP4形式に変換する方法はこちらで紹介しています↓↓↓

動画ファイルのメタ情報を取得する
メディアストアはスマホ本体の画像・音楽・動画をコンテンツリゾルバを経由してアクセスができます。
下記のサンプリでは、メディアストアで管理している動画をコンテンツリゾルバにクエリを指定して、mp4形式の動画ファイルを登録の降順で取得しています。
動画ファイルのアクセスに必要なUriは、ContentUrisを使用して取得しています。
取得した動画ファイルのメタ情報はエンティティ(VideoItem)に格納しています。
    private Map<String, VideoItem>  videoItemMap = new LinkedHashMap<>();
    …
    try {
        ContentResolver resolver = context.getContentResolver();
        Cursor cursor = resolver.query(MediaStore.Video.Media.EXTERNAL_CONTENT_URI, null, "MIME_TYPE == 'video/mp4'", null, "_ID DESC");
        while (cursor.moveToNext()) {
            Uri contentUri = ContentUris.withAppendedId(MediaStore.Video.Media.EXTERNAL_CONTENT_URI, Long.parseLong(cursor.getString(cursor.getColumnIndexOrThrow(MediaStore.Video.Media._ID))));
            videoItemMap.put(cursor.getString(cursor.getColumnIndex(MediaStore.Video.VideoColumns.DISPLAY_NAME)),
                new VideoItem(cursor.getString(cursor.getColumnIndex(MediaStore.Video.VideoColumns.TITLE)),
                    Long.parseLong(cursor.getString(cursor.getColumnIndex(MediaStore.Video.VideoColumns.DURATION))),
                    contentUri, cursor.getString(cursor.getColumnIndex(MediaStore.Video.VideoColumns.DISPLAY_NAME))));
                }
            }
        }
        cursor.close();
    } catch (Exception e) {
        e.printStackTrace();
    }
    …
◎エンティティ(VideoItem)
public class VideoItem {
    public String   title;      // タイトル(xxx)
    public long     duration;   // 再生時間(ms)
    public Uri      videoUri;   // 動画ファイルUri
    public String   source;     // 動画ファイル(xxx.mp4)
    public VideoItem(String title, long duration, Uri videoUri, String source) {
        this.title  = title;
        this.duration = duration;
        this.videoUri = videoUri;
        this.source = source;
    }
}
コントローラを標準のまま使用する
PlayerViewは動画を再生表示するビュー画面です。
PlayerViewには動画の再生や一時停止などを操作するためのコントローラが標準で実装されているため、ExoPlayerをアタッチするだけで、基本的な操作ができるようになります。

標準コントローラの構成は、先頭に戻る(前の動画)、5秒戻る、再生(一時停止)、15秒進む、次の動画を操作できるボタン、動画の再生位置の操作できるスライダー、再生位置(秒)と再生時間(秒)の表示、再生オプションのメニューです。
ExoPlayerはBuilderでインスタンス化します。
サンプルではイヤホンが外れた時に再生を止めるsetHandleAudioBecomingNoisyを指定しています。
標準コントローラの再生オプションで再生速度を変更することができます。
サンプルではインスタンス化したExoPlayerにリスナーを追加し、onPlaybackParametersChangedで再生速度が標準以外に変更された場合にミュートする機能を実装しています。
setPlayerで、PlayerViewにExoPlayerをアタッチします。
再生する動画の指定は、MediaItemを使用します。
動画ファイルのUriを使用してMediaItemを生成します。
再生位置(ミリ秒)を引数にsetMediaItemでExoPlayerにセットします。
セットしたMediaItemのロードは、prepareを使用します。
    …
    PlayerView playerView = dialog.findViewById(R.id.video);
    ExoPlayer exoPlayer = new ExoPlayer.Builder(context)
            .setHandleAudioBecomingNoisy(true)
            .build();
    exoPlayer.addListener(new Player.Listener() {
        @Override
        public void onPlaybackParametersChanged(@NonNull PlaybackParameters playbackParameters) {
            exoPlayer.setVolume(playbackParameters.speed != 1 ? 0 : 1.0);
            Player.Listener.super.onPlaybackParametersChanged(playbackParameters);
        }
    });
    playerView.setPlayer(exoPlayer);
    exoPlayer.setMediaItem(MediaItem.fromUri(uri), 0);
    exoPlayer.prepare();
   …
    // 現在値設定
    dialog.findViewById(R.id.set).setOnClickListener(view -> {
        dialog.findViewById(R.id.set).requestFocus();
        exoPlayer.pause();
        exoPlayer.seekTo(exoPlayer.getContentPosition());
   …
   });
   …
   // closeボタン
   dialog.findViewById(R.id.close).setOnClickListener(view -> {
        exoPlayer.stop();
        exoPlayer.release();
   …
   });
   return dialog;
}
…
再生の一時停止や再生位置の変更はコントローラで行いますが、一時停止はPause、再生位置はseekToにミリ秒を指定することでも可能です。
終了時(画面を閉じる)に停止(stop)とリリース(release)します。
◎レイアウト(dailog.xml)
    …
    <androidx.media3.ui.PlayerView
        android:id="@+id/video"
        android:layout_width="wrap_content"
        android:layout_height="wrap_content"
        app:resize_mode="fill"
        app:show_timeout="500"/>
    …
    <Button
       android:id="@+id/set"
       android:layout_width="wrap_content"
       android:layout_height="wrap_content"/>
    …
    <Button
       android:id="@+id/close"
       android:layout_width="wrap_content"
       android:layout_height="wrap_content"/>
…PlayerViewに動画を再生表示するビュー画面のサイズを指定します。
全体表示はresize_modeに “fill” を指定します。
動画の再生中のコントローラ表示の時間は、show_timeoutにミリ秒を指定します。
コントローラを表示しない場合は0を指定します。
◎標準コントローラの黒の透過表示をキャンセル
標準コントローラは表示中、動画の画面は黒色の透過表示です。
colors.xmlに定義を追加するだけで黒色の透過表示をキャンセルできます。
<resources
    xmlns:tools="http://schemas.android.com/tools">
    …
    <color name="exo_bottom_bar_background" tools:override="true" >#00FFFFFF</color>
    <color name="exo_black_opacity_60" tools:override="true" >#00FFFFFF</color>
</resources>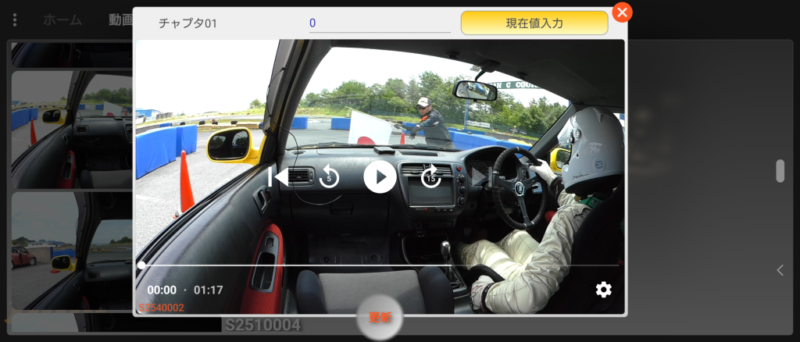
コントローラをカスタムする
標準のコントローラを使用しない場合、レイアウトXMLのPlayerViewの属性(show_timeout)に0を指定し、controller_layout_idにカスタムしたコントローラのレイアウトを指定します。
ExoPlayerのインスタンス化、再生する動画の指定は、コントローラを標準のまま使用する場合と同じです。
サンプルでは動画の再生位置の操作できるスライダー、再生位置(秒)と再生時間(秒)はカスタムしたコントローラに実装するため、DefaultTimeBarを非表示にしています。
private mode = 0;
        …
        ExoPlayer exoPlayer = new ExoPlayer.Builder(context)
                .setHandleAudioBecomingNoisy(true)
                .build();
        exoPlayer.setMediaItem(MediaItem.fromUri(uri), 0);
        exoPlayer.prepare();
        videoView = view.findViewById(R.id.videoView);
        DefaultTimeBar timeBar = videoView.findViewById(R.id.exo_progress);
        timeBar.setVisibility(View.GONE);
        videoView.setPlayer(exoPlayer);
        // PLAY & PAUSE
        control = view.findViewById(R.id.control);
        control.setOnClickListener(view -> {
                if (mode == 1) {
                    // PAUSE
                    exoPlayer.pause();
                    mode = 0;
                    …
                } else {
                    // PLAY
                    exoPlayer.play();
                    mode = 1;
                    …
                }
        });
        return view;
    }
    …

    // onPause //
    @Override
    public void onPause() {
        if (exoPlayer != null) {
            exoPlayer.pause();
        }
        super.onPause();
    }

    // onDestroy //
    @Override
    public void onDestroy() {
        if (exoPlayer != null) {
            exoPlayer.stop();
            exoPlayer.release();
        }
        super.onDestroy();
    }
…サンプルでは再生と一時停止を操作するボタンで用意し、modeで再生と一時停止を切り替えています。
一時停止はPause、再生はplayを使用します。
終了時(画面を閉じる)に停止(stop)とリリース(release)します。
◎レイアウト(fragment.xml)
    …
    <androidx.media3.ui.PlayerView
        android:id="@+id/videoView"
        android:layout_width="wrap_content"
        android:layout_height="wrap_content"
        app:resize_mode="fill"
        app:show_timeout="0"
        app:controller_layout_id="@layout/dialog_controller"/>
…PlayerViewに動画を再生表示するビュー画面のサイズを指定します。
全体表示はresize_modeに “fill” を指定します。
show_timeoutに0を指定し、controller_layout_idにカスタムコントローラを指定します。
◎カスタムコントローラ(dialog_controller.xml)
<RelativeLayout
    xmlns:android="http://schemas.android.com/apk/res/android"
    xmlns:tools="http://schemas.android.com/tools"
    xmlns:app="http://schemas.android.com/apk/res-auto"
    android:layout_width="match_parent"
    android:layout_height="wrap_content">
    <LinearLayout
        android:layout_width="match_parent"
        android:layout_height="wrap_content"
        android:layout_alignParentTop="true"
        android:gravity="center_horizontal"
        android:orientation="vertical"
        tools:ignore="UselessParent">
        <androidx.media3.ui.DefaultTimeBar
            android:id="@+id/exo_progress"
            android:layout_width="match_parent"
            android:layout_height="wrap_content"
            app:buffered_color="@color/blue"
            app:unplayed_color="@color/cyan"
            app:played_color="@color/white"
            app:scrubber_color="@color/white"/>
        <LinearLayout
            android:layout_width="wrap_content"
            android:layout_height="wrap_content"
            android:layout_gravity="end"
            android:layout_marginEnd="4dp"
            android:orientation="horizontal">
            <TextView
                android:id="@+id/exo_position"
                android:layout_width="wrap_content"
                android:layout_height="wrap_content"
                android:textSize="14sp"
                style="@style/TextViewStyle2"/>
            <TextView
                android:layout_width="wrap_content"
                android:layout_height="wrap_content"
                android:text="@string/slash"
                android:textSize="14sp"
                style="@style/TextViewStyle2"/>
            <TextView
                android:id="@+id/exo_duration"
                android:layout_width="wrap_content"
                android:layout_height="wrap_content"
                android:textSize="14sp"
                style="@style/TextViewStyle2"/>
        </LinearLayout>
    </LinearLayout>
</RelativeLayout>レイアウトに配置したViewとコントローラのマッピングは、idで行っています。
コントローラには機能に応じて、idが決まっています。
コントローラにマッピングできるid は、こちらで確認できます。

ExoPlayerで音楽を再生する
ExoPlayerで音楽を再生するには、音楽ファイルのアクセスに必要なUriが必要です。
AIFF形式の音楽ファイルをMP3形式に変換する方法はこちらで紹介しています↓↓↓
ファイルのメタ情報を取得する
メディアストアはスマホ本体の画像・音楽・動画をコンテンツリゾルバを経由してアクセスができます。
下記のサンプリでは、メディアストアで管理している音楽をコンテンツリゾルバにクエリを指定して、音楽ファイルを登録の降順で取得しています。
音楽ファイルのアクセスに必要なUriは、ContentUrisを使用して取得しています。
取得した音楽ファイルのメタ情報はエンティティ(MusicItem)に格納しています。
    private Map<String, MusicItem>  musicItemMap = new LinkedHashMap<>();
    …
    try {
        ContentResolver resolver = context.getContentResolver();
        Cursor cursor = resolver.query(MediaStore.Audio.Media.EXTERNAL_CONTENT_URI, null, "IS_MUSIC != 0", null, "_ID DESC");
        while (cursor.moveToNext()) {
            Uri contentUri = ContentUris.withAppendedId(MediaStore.Audio.Media.EXTERNAL_CONTENT_URI,
                    Long.parseLong(cursor.getString(cursor.getColumnIndexOrThrow(MediaStore.Audio.Media._ID))));
            Uri albumUri = ContentUris.withAppendedId(Uri.parse(context.getString(R.string.jacket_path)),
                    Long.parseLong(cursor.getString(cursor.getColumnIndex(MediaStore.Audio.AudioColumns.ALBUM_ID))));
            musicItemMap.put(cursor.getString(cursor.getColumnIndex(MediaStore.Audio.AudioColumns.DISPLAY_NAME)),
                    new MusicItem(cursor.getString(cursor.getColumnIndex(MediaStore.Audio.Media.TITLE)),
                            cursor.getString(cursor.getColumnIndex(MediaStore.Audio.Media.ARTIST)),
                            Long.parseLong(cursor.getString(cursor.getColumnIndex(MediaStore.Audio.AudioColumns.DURATION))),
                            albumUri, contentUri, cursor.getString(cursor.getColumnIndex(MediaStore.Audio.AudioColumns.DISPLAY_NAME))));
        }
        cursor.close();
    } catch (Exception e) {
        e.printStackTrace();
    }
…AIFF対応のサンプル
    private Map<String, MusicItem>  MusicItemMap = new LinkedHashMap<>();
    …

    @SuppressLint("Range")
    public void MediaStore(String sortOrder) {
        ExecutorService executorService = Executors.newSingleThreadExecutor();
        executorService.execute(() -> {
            try {
                ContentResolver resolver = context.getContentResolver();
                Cursor cursor = resolver.query(MediaStore.Audio.Media.EXTERNAL_CONTENT_URI, null, "IS_MUSIC != 0", null, sortOrder);
                while (cursor.moveToNext()) {
                    // ファイル名 : MIMEタイプ
                    String source = cursor.getString(cursor.getColumnIndex(MediaStore.Audio.AudioColumns.DISPLAY_NAME));
                    String duration = cursor.getString(cursor.getColumnIndex(MediaStore.Audio.AudioColumns.DURATION));
                    Uri contentUri = ContentUris.withAppendedId(MediaStore.Audio.Media.EXTERNAL_CONTENT_URI, Long.parseLong(cursor.getString(cursor.getColumnIndexOrThrow(MediaStore.Audio.Media._ID))));
                    Uri albumUri = ContentUris.withAppendedId(Uri.parse(context.getString(R.string.jacket_path)), Long.parseLong(cursor.getString(cursor.getColumnIndex(MediaStore.Audio.AudioColumns.ALBUM_ID))));
                    String[] aif1 = new String[]{"audio/x-aiff", "audio/aiff"};
                    musicItem = null;
                    // AIFF形式の判定
                    if (Arrays.asList(aif1).contains(cursor.getString(cursor.getColumnIndex(MediaStore.Audio.Media.MIME_TYPE)))) {
                        // mp3ファイル変換
                        :
                    }
                    if (contentUri != null) {
                        musicItemMap.put(source,
                                musicItem != null ? musicItem :
                                        new MusicItem(cursor.getString(cursor.getColumnIndex(MediaStore.Audio.Media.TITLE)),
                                                cursor.getString(cursor.getColumnIndex(MediaStore.Audio.Media.ARTIST)),
                                                Long.parseLong(duration != null ? duration : String.valueOf(0)),
                                                albumUri, contentUri, source));
                    }
                }
                cursor.close();
                // ソート
                switch (sortOrder) {
                    case "TITLE ASC":
                        Map<String, MusicItem> titleMap = new TreeMap<>();
                        musicItemMap.forEach((key, value) -> titleMap.put(value.title + value.source, value));
                        musicItemMap = new LinkedHashMap<>();
                        titleMap.forEach((key, value) -> musicItemMap.put(value.source, value));
                        break;
                    case "ARTIST ASC":
                        Map<String, MusicItem> artistMap = new TreeMap<>();
                        musicItemMap.forEach((key, value) -> artistMap.put(value.artist + value.source, value));
                        musicItemMap = new LinkedHashMap<>();
                        artistMap.forEach((key, value) -> musicItemMap.put(value.source, value));
                        break;
                    default:
                        break;
                }
    …
ContentResolverのqueryの結果をLinkedHashMapに展開、順序を確保しているが、Android14ではAIFF形式のファイルのsortOrderが機能しないため、TreeMapでソートを行い、LinkedHashMap再展開しています。
◎エンティティ(MusicItem)
public class MusicItem {
    public String   title;      // タイトル
    public String   artist;     // アーティスト
    public long     duration;   // 再生時間
    public Uri      albumUri;   // アルバムUri
    public Uri      musicUri;   // 音楽ファイルUri
    public String   source;     // 音楽ファイル
    public MusicItem(String title, String artist, long duration, Uri albumUri, Uri musicUri, String source) {
        this.title    = title;
        this.artist   = artist;
        this.duration = duration;
        this.albumUri = albumUri;
        this.musicUri = musicUri;
        this.source   = source;
    }
}
コントローラビューをカスタムする
音楽の再生をコントールする場合、PlayerControlViewを使用します。
PlayerControlViewには音楽の再生や一時停止などを操作するためのコントローラが標準で実装されているため、ExoPlayerをアタッチするだけで、基本的な操作ができるようになります。

カスタムしたコントローラの構成は、先頭に戻る(前曲)、10秒戻る、再生(一時停止)、10秒進む、次曲を操作できるボタン、動画の再生位置の操作できるスライダー、再生位置(秒)と再生時間(秒)のテキスト表示です。
ExoPlayerはBuilderでインスタンス化します。
サンプルでは戻るボタンで戻る時間(ミリ秒)、進むボタンで進む時間(ミリ秒)を指定して、setPlayerでPlayerControlViewにExoPlayerをアタッチしています。
再生する音楽の指定は、MediaItemを使用します。
サンプルではエンティティ(MusicItem)にセットしているメタ情報から、タイトル、アーティスト、ジャケット画像、音楽ファイルのUriを取得し、ダイアログ画面に再生している音楽の情報を表示しています。
音楽ファイルのUriを使用してMediaItemを生成、setMediaItemsで再生順にリスト化したMediaItemをExoPlayerにセットしています。
インスタンス化したExoPlayerにリスナーを追加し、onMediaItemTransitionで再生している音楽が切り替わった場合にダイアログ画面の再生している音楽の情報を更新する機能を実装しています。
セットしたMediaItemのロードはprepare 、再生はplayを使用します。
    private Map<Integer, MusicItem> musicItemMap = new HashMap<>();
    …
    @Override
    public Dialog onCreateDialog(Bundle savedInstanceState) {
        …
        PlayerControlView playerControlView = dialog.findViewById(R.id.player);
        ExoPlayer.Builder playerBuilder = new ExoPlayer.Builder(requireActivity());
        playerBuilder.setSeekBackIncrementMs(10000);
        playerBuilder.setSeekForwardIncrementMs(10000);
        ExoPlayer exoPlayer = playerBuilder.build();
        playerControlView.setPlayer(exoPlayer);
        if (musicItems.size() > 0) {
            MusicItem item = musicItems.get(0);
            setView(item.title, item.artist, item.musicUri, item.albumUri);
            List<MediaItem> mediaItemList = new ArrayList<>();
            for (MusicItem musicItem : musicItems) {
                MediaItem mediaItem = MediaItem.fromUri(musicItem.musicUri);
                musicItemMap.put(mediaItem.hashCode(), musicItem);
                mediaItemList.add(mediaItem);
            }
            exoPlayer.setMediaItems(mediaItemList);
        }
        exoPlayer.addListener(new Player.Listener() {
            @Override
            public void onMediaItemTransition(@Nullable MediaItem mediaItem, int reason) {
                Player.Listener.super.onMediaItemTransition(mediaItem, reason);
                if (mediaItem != null) {
                    MusicItem item = musicItemMap.get(mediaItem.hashCode());
                    if (item != null) {
                        setView(item.title, item.artist, item.musicUri, item.albumUri);
                    }
                }
            }
        });
        exoPlayer.prepare();
        exoPlayer.play();
        // closeボタン
        dialog.findViewById(R.id.dialog_close).setOnClickListener(view -> {
            exoPlayer.stop();
            exoPlayer.release();
            dismiss();
        });
        return dialog;
    }

    @Override
    public void onDetach() {
        exoPlayer.stop();
        exoPlayer.release();
        super.onDetach();
    }

    // MusicItemMapセット
    public void setMusicItemMap(Map<String, MusicItem> musicItemMap, int MUSICLIST) {
        List<MusicItem> musicItemList = new ArrayList<>();
        musicItemMap.forEach((key, value) -> musicItemList.add(value));
        List<Integer> randomList = new ArrayList<>();
        Random rand = new Random();
        MUSICLIST = Math.min(MUSICLIST, musicItemList.size());
        MUSICLIST = MUSICLIST > 10 &&  (int)(MUSICLIST * 1.1) > musicItemList.size() ?  (int) (musicItemList.size() / 1.1)  : MUSICLIST;
        boolean random = rand.nextInt(musicItemList.size()) % 3 != 0;
        while (randomList.size() < MUSICLIST || randomList.size() < musicItemList.size()) {
            randomList.add(rand.nextInt(musicItemList.size()));
            randomList = new ArrayList<>(new LinkedHashSet<>(randomList));
        }
        for (int i = 0; i < MUSICLIST; i++) {
            musicItems.add(musicItemList.get(randomList.get(i)));
        }
    }

    // Viewセット
    private void setView(String string1, String string2, Uri uri1, Uri uri2) {
        title.setText(string1);
        title.setSelected(true);
        artist.setText(string2);
        artist.setSelected(true);
        ContentResolver contentResolver = context.getContentResolver();
        try {
            InputStream inputStream = contentResolver.openInputStream(uri2);
            Bitmap bitmap = BitmapFactory.decodeStream(inputStream);
            imageView.setScaleType(CENTER_CROP);
            imageView.setImageBitmap(bitmap);
        } catch (FileNotFoundException e) {
            MediaMetadataRetriever mediaMetadataRetriever = new MediaMetadataRetriever();
            mediaMetadataRetriever.setDataSource(context, uri1);
            byte[] binary = mediaMetadataRetriever.getEmbeddedPicture();
            if (binary != null) {
                imageView.setScaleType(CENTER_CROP);
                imageView.setImageBitmap(BitmapFactory.decodeByteArray(binary, 0, binary.length));
            } else {
                imageView.setScaleType(CENTER_INSIDE);
                imageView.setImageResource(R.drawable.no_image);
            }
            if (Build.VERSION.SDK_INT >= Build.VERSION_CODES.Q) {
                try {
                    mediaMetadataRetriever.close();
                } catch (IOException ex) {
                    Log.d(TAG, String.format("setView:%s", ex.getMessage()));
                    ex.printStackTrace();
                }
            }
        }
    }
サンプルのsetMusicItemMapは、音楽ファイルの再生リストをランダムで作成しています。
終了時(画面を閉じる)に停止(stop)とリリース(release)します。
ジャケット画像を表示する方法は、音楽ファイルのジャケット画像を表示するで紹介しています。
◎レイアウト(dailog.xml)
<RelativeLayout
    xmlns:android="http://schemas.android.com/apk/res/android"
    xmlns:app="http://schemas.android.com/apk/res-auto"
    xmlns:tools="http://schemas.android.com/tools"
    android:layout_width="match_parent"
    android:layout_height="232dp">
    <LinearLayout
        android:id="@+id/main"
        android:layout_width="match_parent"
        android:layout_height="match_parent"
        android:layout_alignParentTop="true"
        android:layout_marginTop="8dp"
        android:layout_marginStart="8dp"
        android:layout_marginEnd="8dp"
        android:layout_marginBottom="38dp"
        android:gravity="center_horizontal"
        android:orientation="vertical">
        <LinearLayout
            android:layout_width="match_parent"
            android:layout_height="wrap_content"
            android:orientation="horizontal"
            tools:ignore="UselessParent">
            <RelativeLayout
                android:id="@+id/frame"
                android:layout_width="96dp"
                android:layout_height="96dp"
                android:layout_margin="4dp">
                <androidx.cardview.widget.CardView
                    android:layout_width="wrap_content"
                    android:layout_height="wrap_content"
                    app:cardCornerRadius="8dp"
                    app:cardElevation="0dp">
                    <ImageView
                        android:id="@+id/image1"
                        android:layout_width="96dp"
                        android:layout_height="96dp"
                        android:scaleType="centerCrop"
                        tools:ignore="ContentDescription" />
                </androidx.cardview.widget.CardView>
            </RelativeLayout>
            <LinearLayout
                android:layout_width="match_parent"
                android:layout_height="wrap_content"
                android:layout_marginTop="4dp"
                android:orientation="vertical">
                <TextView
                    android:id="@+id/title"
                    android:layout_width="wrap_content"
                    android:layout_height="wrap_content"
                    android:layout_marginTop="2dp"
                    android:layout_marginStart="4dp"
                    android:singleLine="true"
                    android:ellipsize="marquee"/>
                <TextView
                    android:id="@+id/artist"
                    android:layout_width="wrap_content"
                    android:layout_height="wrap_content"
                    android:layout_marginStart="4dp"
                    android:layout_marginBottom="2dp"
                    android:singleLine="true"
                    android:ellipsize="marquee"/>
            </LinearLayout>
        </LinearLayout>
    </LinearLayout>
    <androidx.media3.ui.PlayerControlView
        android:id="@+id/player"
        android:layout_width="match_parent"
        android:layout_height="wrap_content"
        android:layout_alignParentBottom="true"
        app:show_timeout="0"
        app:controller_layout_id="@layout/dialog_controller"/>
    <Button
        android:id="@+id/dialog_close"
        android:layout_width="30dp"
        android:layout_height="30dp"
        android:layout_alignParentEnd="true"
        android:layout_alignParentTop="true"/>
</RelativeLayout>ダイアログ画面にコントローラ(PlayerControlView)を配置します。
show_timeoutに0を指定し、controller_layout_idにカスタムコントローラを指定します。
◎カスタムコントローラ(dialog_controller.xml)
<RelativeLayout
    xmlns:android="http://schemas.android.com/apk/res/android"
    xmlns:tools="http://schemas.android.com/tools"
    xmlns:app="http://schemas.android.com/apk/res-auto"
    android:layout_width="match_parent"
    android:layout_height="wrap_content">
    <LinearLayout
        android:id="@+id/main"
        android:layout_width="match_parent"
        android:layout_height="wrap_content"
        android:layout_alignParentTop="true"
        android:layout_margin="8dp"
        android:gravity="center_horizontal"
        android:orientation="vertical"
        tools:ignore="UselessParent">
        <androidx.media3.ui.DefaultTimeBar
            android:id="@+id/exo_progress"
            android:layout_width="match_parent"
            android:layout_height="wrap_content"
            app:played_color="@color/white"
            app:scrubber_color="@color/white"/>
        <LinearLayout
            android:layout_width="wrap_content"
            android:layout_height="wrap_content"
            android:layout_gravity="end"
            android:layout_marginEnd="8dp"
            android:orientation="horizontal">
            <TextView
                android:id="@+id/exo_position"
                android:layout_width="wrap_content"
                android:layout_height="wrap_content"/>
            <TextView
                android:layout_width="wrap_content"
                android:layout_height="wrap_content"/>
            <TextView
                android:id="@+id/exo_duration"
                android:layout_width="wrap_content"
                android:layout_height="wrap_content"/>
        </LinearLayout>
        <LinearLayout
        android:layout_width="wrap_content"
        android:layout_height="wrap_content"
        android:orientation="horizontal">
            <RelativeLayout
                android:id="@+id/prev"
                android:layout_width="48dp"
                android:layout_height="48dp"
                android:layout_margin="6dp">
                <ImageView
                    android:id="@+id/exo_prev"
                    android:layout_width="32dp"
                    android:layout_height="32dp"
                    android:layout_centerInParent="true"
                    android:src="@drawable/ic_round_rwd"
                    tools:ignore="ContentDescription" />
            </RelativeLayout>
            <RelativeLayout
                android:layout_width="48dp"
                android:layout_height="48dp"
                android:layout_margin="6dp">
                <ImageView
                    android:id="@+id/exo_rew"
                    android:layout_width="32dp"
                    android:layout_height="32dp"
                    android:layout_centerInParent="true"
                    tools:ignore="ContentDescription" />
            </RelativeLayout>
            <ImageView
                android:id="@+id/exo_play_pause"
                android:layout_width="60dp"
                android:layout_height="60dp"
                tools:ignore="ContentDescription" />
            <RelativeLayout
                android:layout_width="48dp"
                android:layout_height="48dp"
                android:layout_margin="6dp">
                <ImageView
                    android:id="@+id/exo_ffwd"
                    android:layout_width="32dp"
                    android:layout_height="32dp"
                    android:layout_centerInParent="true"/>
            </RelativeLayout>
            <RelativeLayout
                android:id="@+id/next"
                android:layout_width="48dp"
                android:layout_height="48dp"
                android:layout_margin="6dp">
                <ImageView
                    android:id="@+id/exo_next"
                    android:layout_width="32dp"
                    android:layout_height="32dp"
                    android:layout_centerInParent="true"
                    tools:ignore="ContentDescription" />
            </RelativeLayout>
        </LinearLayout>
    </LinearLayout>
</RelativeLayout>
レイアウトに配置した View とコントローラのマッピングは、idで行っています。
コントローラには機能に応じて、idが決まっています。
コントローラにマッピングできるidは、こちらで確認できます。

カスタムコントロールのアイコンを変更する方法はコチラ↓↓↓
音量の変更を検知する
画面以外から選曲する方法として、ボリューム操作を⊕👉⊖で次の曲、⊖👉⊕で前の曲を再生する方法を紹介します。
Bluetoothスピーカーからの操作で選曲するニーズに応える機能として実装しました。
    private int                     device;
    private int                     playback;
    :
    @OptIn(markerClass = UnstableApi.class)
    @Override
    public void onCreate() {
        super.onCreate();
        :
        // EXOPLAYER
        exoPlayer = new ExoPlayer.Builder(context)
                .setDeviceVolumeControlEnabled(true)
                .setHandleAudioBecomingNoisy(true)
                .build();
        exoPlayer.addListener(new Player.Listener() {
            :
            @Override
            public void onDeviceVolumeChanged(int volume, boolean muted) {
                Player.Listener.super.onDeviceVolumeChanged(volume, muted);
                if (playback == 0 && device != volume) {
                    playback = device > volume ? -1 : 1;
                } else {
                    sound(select);
                    if (playback > 0 && device > volume) exoPlayer.seekToNextMediaItem();
                    if (playback < 0 && device < volume) exoPlayer.seekToPrevious();
                    playback = 0;
                }
                device = volume;
            }
        });
:音量の変更を検知するには、ExoPlayerをインスタンス化する際にsetDeviceVolumeControlEnabledでtrueを指定します。ExoPlayerのリスナーにonDeviceVolumeChangedを追加します。
今回は、ここまでです。
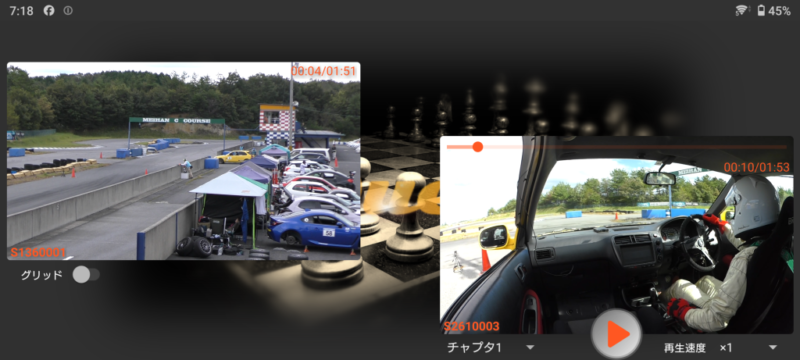
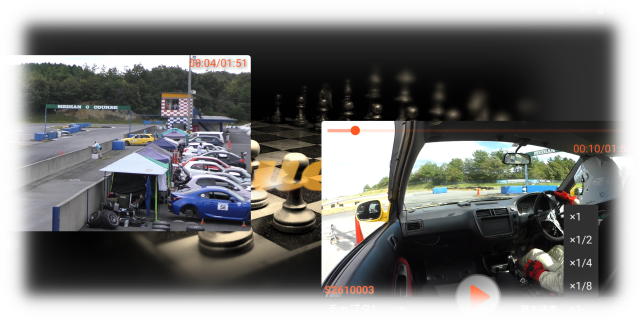
ExoPlayerで動画を再生している Androidアプリです。
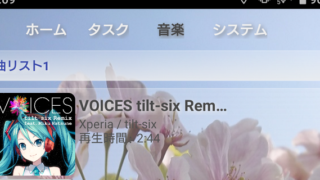
ExoPlayerで音楽を再生している Androidアプリです。

IPX7防水でお風呂でも使用可能です。
誤字脱字、意味不明でわかりづらい、
もっと詳しく知りたいなどのご意見は、
このページの最後にあるコメントか、
こちらから、お願いいたします♪
ポチッとして頂けると、
次のコンテンツを作成する励みになります♪
これからAndroidのアプリ開発やJavaでの開発を始めたい方へ
アプリケーション開発経験がない方や、アプリケーション開発経験がある方でも、JavaやC#などのオブジェクト指向言語が初めての方は、Androidのアプリ開発ができるようになるには、かなりの時間がかかります。
オンラインスクールでの習得を、強くおススメします。
未経験者からプログラマーを目指すのに最適です。まずは無料カウンセリングから♪

ゲーム系に強いスクール、UnityやUnrealEngineを習得するのに最適です。まずは無料オンライン相談から♪

参考になったら、💛をポッチとしてね♪
コメント欄